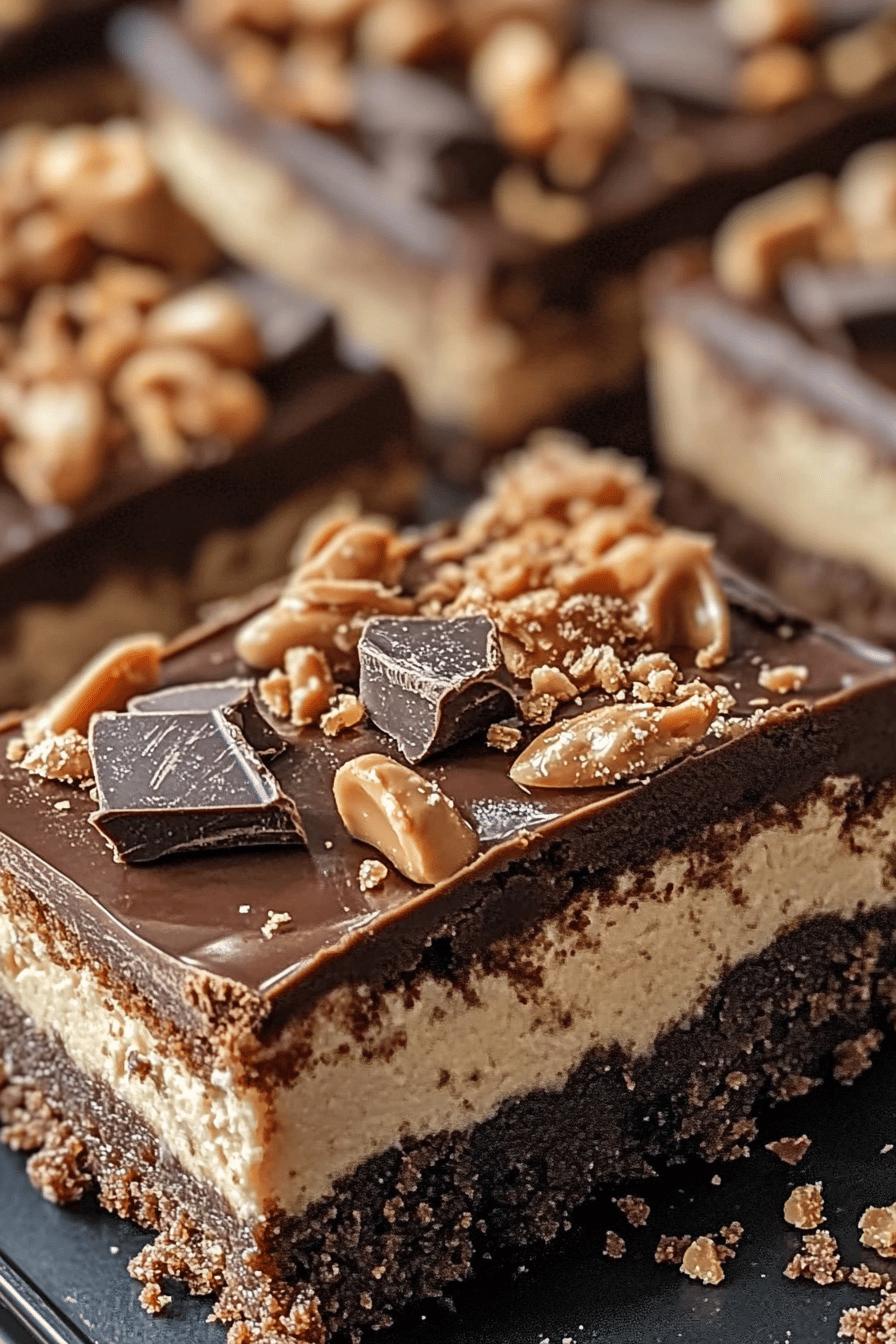
Introduction to Reeses Butterfinger Cheesecake Bars
Are you ready to treat yourself to something truly special? The Reeses Butterfinger Cheesecake Bars are a delightful combination of flavors and textures that will make your taste buds dance with joy. These bars are not just any dessert; they are a celebration of creamy cheesecake, crunchy Butterfinger, and a nutty almond flour crust. Each bite is a perfect blend of sweetness and richness, making them an irresistible choice for any occasion.
What Makes Reeses Butterfinger Cheesecake Bars Special?
What sets these cheesecake bars apart? First, the almond flour crust provides a gluten-free base that is both delicious and nutritious. Almond flour is packed with healthy fats and protein, making it a great alternative to traditional flour. Next, the creamy cheesecake filling is smooth and rich, thanks to the perfect blend of cream cheese and peanut butter. Finally, the Butterfinger topping adds a delightful crunch and a burst of chocolatey flavor that ties everything together. This unique combination makes these bars a standout dessert that everyone will love!
Why You Should Try This Recipe Today
Why wait to indulge in these scrumptious bars? They are easy to make and perfect for any occasion, whether it’s a family gathering, a potluck, or just a cozy night in. Plus, they are a guilt-free treat that satisfies your sweet tooth without compromising on flavor. With simple ingredients and straightforward steps, you can whip up a batch in no time. So, gather your ingredients and get ready to impress your friends and family with these delightful Reeses Butterfinger Cheesecake Bars!
Ingredients for Reeses Butterfinger Cheesecake Bars
To create the delicious Reeses Butterfinger Cheesecake Bars, you’ll need a few simple ingredients. Each component plays a vital role in achieving that perfect balance of flavors and textures. Here’s what you’ll need:
- For the Almond Flour Crust:
- 1 ½ cups almond flour
- ¼ cup coconut oil, melted
- 2 tablespoons honey or maple syrup
- 1 teaspoon vanilla extract
- ¼ teaspoon salt
- For the Creamy Cheesecake Filling:
- 16 oz cream cheese, softened
- ½ cup peanut butter
- ½ cup sweetener of choice (like erythritol or stevia)
- 2 large eggs
- 1 teaspoon vanilla extract
- ¼ cup heavy cream
- For the Butterfinger Topping:
- 1 cup Butterfinger candy bars, crushed
- ¼ cup chocolate chips (optional, for drizzling)
These ingredients come together to create a dessert that is not only delicious but also easy to prepare. The almond flour crust is a fantastic gluten-free option, while the creamy filling is rich and satisfying. Don’t forget the Butterfinger topping, which adds that extra crunch and sweetness!
Step-by-Step Preparation of Reeses Butterfinger Cheesecake Bars
Now that you have all your ingredients ready, it’s time to dive into the fun part: making your Reeses Butterfinger Cheesecake Bars. Follow these simple steps to create a dessert that will wow your friends and family!
Step 1: Prepare the Almond Flour Crust
First, let’s get started with the almond flour crust. Preheat your oven to 350°F (175°C). In a mixing bowl, combine the almond flour, melted coconut oil, honey (or maple syrup), vanilla extract, and salt. Mix everything together until it forms a crumbly dough. Next, press this mixture evenly into the bottom of a lined 8×8-inch baking dish. Make sure to pack it down firmly. Bake the crust for about 10-12 minutes, or until it’s lightly golden. Once done, remove it from the oven and let it cool while you prepare the filling.
Step 2: Make the Creamy Cheesecake Filling
Now, let’s whip up that creamy cheesecake filling! In a large mixing bowl, beat the softened cream cheese until it’s smooth and fluffy. Then, add in the peanut butter and sweetener of your choice. Mix until well combined. Next, add the eggs, one at a time, mixing well after each addition. Finally, stir in the vanilla extract and heavy cream. Your filling should be creamy and luscious, ready to be poured over the cooled crust.
Step 3: Assemble the Bars
With the crust cooled and the filling ready, it’s time to assemble your bars. Pour the creamy cheesecake filling over the almond flour crust, spreading it evenly with a spatula. Make sure to cover the crust completely. This layer of cheesecake is what makes these bars so indulgent and delicious!
Step 4: Add the Butterfinger Topping
Now comes the fun part—adding the Butterfinger topping! Sprinkle the crushed Butterfinger candy bars generously over the cheesecake filling. If you want to take it up a notch, melt some chocolate chips and drizzle them over the top for an extra touch of sweetness. This will not only enhance the flavor but also make your bars look even more tempting!
Step 5: Chill and Set the Bars
Finally, it’s time to chill your creation. Place the assembled bars in the refrigerator and let them set for at least 4 hours, or overnight if you can wait! This chilling time allows the flavors to meld together and the cheesecake to firm up. Once set, cut the bars into squares and enjoy your delicious Reeses Butterfinger Cheesecake Bars!
Variations of Reeses Butterfinger Cheesecake Bars
If you’re feeling adventurous, there are many ways to customize your Reeses Butterfinger Cheesecake Bars. Whether you want to switch up the crust or try different toppings, these variations will keep your dessert game exciting!
Alternative Crust Options
While the almond flour crust is delicious, you can easily swap it out for other options. Here are a few ideas:
- Oreo Crust: Crush up some gluten-free Oreo cookies and mix them with melted butter. This will give your bars a rich chocolate flavor that pairs perfectly with the cheesecake.
- Graham Cracker Crust: For a classic touch, use crushed gluten-free graham crackers mixed with coconut oil and a bit of sweetener. This crust adds a nice crunch and a hint of cinnamon.
- Nut-Based Crust: Blend nuts like pecans or walnuts with dates and a pinch of salt. This no-bake option is healthy and adds a chewy texture to your bars.
Feel free to experiment with these crusts to find your favorite combination!
Different Toppings to Try
The topping is where you can really get creative! Here are some fun ideas to elevate your Reeses Butterfinger Cheesecake Bars:
- Chocolate Ganache: Melt chocolate and heavy cream together to create a rich ganache. Pour it over the cheesecake layer for a luxurious finish.
- Peanut Butter Drizzle: Mix peanut butter with a little coconut oil and microwave it until smooth. Drizzle this over the top for an extra peanut butter punch.
- Chopped Nuts: Add a sprinkle of chopped peanuts or almonds for added crunch and flavor. This will complement the Butterfinger topping beautifully.
- Fruit Topping: For a fresh twist, top your bars with sliced strawberries or raspberries. The tartness of the fruit balances the sweetness of the cheesecake.
These variations not only enhance the flavor but also make your dessert visually appealing. So, don’t hesitate to mix and match until you find your perfect combination!
Cooking Note for Reeses Butterfinger Cheesecake Bars
When making Reeses Butterfinger Cheesecake Bars, a few cooking notes can help ensure your dessert turns out perfectly every time. These tips will guide you through the process and help you avoid common pitfalls.
First, always use room temperature ingredients. This is especially important for the cream cheese. If it’s too cold, it won’t blend smoothly, leading to lumps in your cheesecake filling. To speed up the process, you can cut the cream cheese into small cubes and let it sit out for about 30 minutes before mixing.
Next, be careful not to overmix the cheesecake filling. While you want everything to be well combined, overmixing can introduce too much air into the batter. This can cause the cheesecake to crack while baking or chilling. Mix just until smooth and creamy for the best results.
Additionally, when baking the almond flour crust, keep an eye on it. Ovens can vary, and you don’t want the crust to become too dark. A light golden color is perfect. If you notice it browning too quickly, you can cover it loosely with aluminum foil.
Lastly, patience is key when it comes to chilling the bars. Allowing them to set for at least 4 hours, or even overnight, will enhance the flavors and improve the texture. The longer they chill, the firmer and more delicious they will be!
By following these cooking notes, you’ll create Reeses Butterfinger Cheesecake Bars that are not only tasty but also visually stunning. Enjoy the process and the delightful results!
Serving Suggestions for Reeses Butterfinger Cheesecake Bars
Once your Reeses Butterfinger Cheesecake Bars are ready, it’s time to think about how to serve them. The right presentation and beverage pairings can elevate your dessert experience. Here are some delightful suggestions to make your bars shine!
Pairing with Beverages
Choosing the right drink can enhance the flavors of your cheesecake bars. Here are some tasty beverage options to consider:
- Coffee: A warm cup of coffee pairs beautifully with the rich flavors of the cheesecake. The bitterness of the coffee balances the sweetness of the bars, creating a perfect harmony.
- Milk: For a classic combination, serve your bars with a glass of cold milk. Whether it’s regular, almond, or oat milk, the creaminess complements the cheesecake perfectly.
- Hot Chocolate: If you’re in the mood for something cozy, a cup of hot chocolate is a delightful choice. The chocolatey goodness will enhance the Butterfinger topping, making each bite even more indulgent.
- Herbal Tea: For a lighter option, consider herbal tea. Flavors like chamomile or peppermint can provide a refreshing contrast to the rich cheesecake.
These beverage pairings will not only enhance the flavors of your Reeses Butterfinger Cheesecake Bars but also create a delightful experience for your guests.
Presentation Ideas
How you present your cheesecake bars can make a big difference. Here are some creative ideas to make your dessert look as good as it tastes:
- Garnish with Whipped Cream: Add a dollop of whipped cream on top of each bar for a touch of elegance. You can even sprinkle some crushed Butterfinger on the whipped cream for added flair.
- Use a Decorative Plate: Serve your bars on a beautiful platter or cake stand. A colorful plate can make your dessert pop and catch the eye of your guests.
- Drizzle with Chocolate: For a professional touch, drizzle melted chocolate over the bars before serving. This not only looks stunning but also adds an extra layer of flavor.
- Fresh Fruit Accents: Place a few fresh berries or slices of fruit around the bars on the serving plate. This adds color and freshness, making the dessert more inviting.
With these serving suggestions, your Reeses Butterfinger Cheesecake Bars will be the star of any gathering. Enjoy the compliments as your guests savor every delicious bite!
Tips for Perfecting Reeses Butterfinger Cheesecake Bars
Creating the perfect Reeses Butterfinger Cheesecake Bars can be a delightful experience. However, there are a few common mistakes to watch out for. By avoiding these pitfalls, you can ensure your dessert turns out just right every time!
Common Mistakes to Avoid
Here are some common mistakes that can affect the outcome of your cheesecake bars:
- Using Cold Ingredients: Always use room temperature ingredients, especially cream cheese. Cold ingredients can lead to lumps in your filling, making it less smooth.
- Overmixing the Filling: While it’s important to mix well, overmixing can introduce too much air. This can cause cracks in your cheesecake as it sets. Mix just until smooth.
- Skipping the Chilling Time: Patience is key! Skipping the chilling time can result in a soft and messy texture. Allow your bars to chill for at least 4 hours, or overnight for the best results.
- Not Lining the Baking Dish: Always line your baking dish with parchment paper. This makes it easier to lift the bars out and cut them into neat squares.
- Not Checking for Doneness: Keep an eye on your crust while baking. If it gets too dark, it can affect the flavor. A light golden color is ideal.
By avoiding these common mistakes, you’ll be well on your way to making perfect Reeses Butterfinger Cheesecake Bars that everyone will love!
Storage Tips for Leftovers
If you happen to have leftovers (which is rare with these delicious bars!), here are some tips for storing them:
- Refrigerate: Store your cheesecake bars in an airtight container in the refrigerator. They will stay fresh for up to 5 days.
- Freeze for Longer Storage: If you want to keep them longer, you can freeze the bars. Wrap them tightly in plastic wrap and then place them in a freezer-safe container. They can last up to 3 months in the freezer.
- Thawing: When you’re ready to enjoy your frozen bars, simply transfer them to the refrigerator to thaw overnight. This will help maintain their texture and flavor.
- Reheat if Desired: If you prefer your cheesecake bars slightly warm, you can microwave them for a few seconds. Just be careful not to overheat them!
With these storage tips, you can enjoy your Reeses Butterfinger Cheesecake Bars for days to come. Whether you’re savoring them fresh or from the fridge, they’re sure to delight!
Breakdown of Time for Reeses Butterfinger Cheesecake Bars
Understanding the time needed to make Reeses Butterfinger Cheesecake Bars can help you plan your baking session. Here’s a simple breakdown of the time involved in preparing this delicious dessert.
Prep Time
The prep time for these cheesecake bars is quite manageable. You’ll need about 20-25 minutes to gather your ingredients and prepare the crust and filling. This includes mixing the almond flour crust and the creamy cheesecake filling. Make sure to have everything ready before you start, as it will make the process smoother!
Cooking Time
Once your crust is prepared, the cooking time is relatively short. You’ll bake the almond flour crust for about 10-12 minutes. After that, the cheesecake filling doesn’t require baking, but it does need to chill. This chilling time is crucial for the bars to set properly.
Total Time
In total, you should expect to spend around 4 hours and 30 minutes to make Reeses Butterfinger Cheesecake Bars. This includes the prep time, baking time, and the minimum chilling time of 4 hours. If you can wait overnight, the flavors will deepen, making your bars even more delicious!
So, set aside some time, gather your ingredients, and get ready to enjoy these delightful cheesecake bars. They are worth every minute spent in the kitchen!
Nutritional Information for Reeses Butterfinger Cheesecake Bars
Understanding the nutritional content of your Reeses Butterfinger Cheesecake Bars can help you enjoy them guilt-free. These bars are not only delicious but also packed with beneficial ingredients. Let’s break down the calories and macronutrients, as well as the health benefits of the key ingredients used in this recipe.
Calories and Macronutrients
Each serving of Reeses Butterfinger Cheesecake Bars offers a satisfying treat without overwhelming your daily calorie intake. Here’s a general overview of the nutritional content per bar (based on a recipe yielding 12 bars):
- Calories: Approximately 180-200 calories
- Protein: 5-6 grams
- Fat: 15-17 grams
- Carbohydrates: 10-12 grams
- Fiber: 2-3 grams
- Sugar: 3-5 grams (depending on sweetener used)
These bars provide a good balance of protein and healthy fats, making them a satisfying dessert option. The use of almond flour and peanut butter contributes to the protein content, while the healthy fats help keep you feeling full longer.
Health Benefits of Ingredients
The ingredients in Reeses Butterfinger Cheesecake Bars not only create a delicious dessert but also offer several health benefits:
- Almond Flour: Rich in vitamin E, magnesium, and healthy fats, almond flour is a great gluten-free alternative. It supports heart health and may help regulate blood sugar levels.
- Coconut Oil: This oil contains medium-chain triglycerides (MCTs), which can provide quick energy and may support weight management. It also has antimicrobial properties.
- Peanut Butter: Packed with protein and healthy fats, peanut butter can help keep you satisfied. It also contains vitamins and minerals like vitamin E, magnesium, and potassium.
- Butterfinger Topping: While it adds sweetness, the chocolate and peanut butter combination can provide a quick energy boost. Enjoying it in moderation can satisfy your sweet cravings without overindulging.
By choosing these wholesome ingredients, you can enjoy your Reeses Butterfinger Cheesecake Bars while also reaping some health benefits. So, go ahead and indulge in this delightful treat, knowing that it’s not just a dessert, but a delicious way to enjoy nutritious ingredients!
FAQs about Reeses Butterfinger Cheesecake Bars
Can I make Reeses Butterfinger Cheesecake Bars ahead of time?
Absolutely! In fact, making Reeses Butterfinger Cheesecake Bars ahead of time is a great idea. These bars need time to chill and set properly, which enhances their flavor and texture. You can prepare them a day or two in advance and store them in the refrigerator. Just remember to cover them well with plastic wrap or place them in an airtight container to keep them fresh. This way, you can enjoy a delicious dessert without the last-minute rush!
How do I store leftover Reeses Butterfinger Cheesecake Bars?
If you have any leftovers (which is rare with these tasty bars!), storing them properly is key. Place your Reeses Butterfinger Cheesecake Bars in an airtight container and keep them in the refrigerator. They will stay fresh for up to 5 days. If you want to keep them longer, you can freeze them. Just wrap each bar tightly in plastic wrap and then place them in a freezer-safe container. They can last up to 3 months in the freezer. When you’re ready to enjoy them, simply thaw them in the refrigerator overnight.
Can I substitute ingredients in the recipe?
Yes, you can definitely substitute ingredients in the Reeses Butterfinger Cheesecake Bars recipe! Here are some ideas:
- Sweeteners: If you prefer a different sweetener, you can use sugar, honey, or agave syrup instead of erythritol or stevia. Just keep in mind that this may change the overall sweetness and calorie count.
- Nut Butters: If you’re not a fan of peanut butter, you can use almond butter or cashew butter for a different flavor profile.
- Crust Options: As mentioned earlier, feel free to experiment with different crusts, like an Oreo or graham cracker crust, to suit your taste.
- Dairy Alternatives: For a dairy-free version, use vegan cream cheese and coconut cream instead of heavy cream.
These substitutions can help you tailor the recipe to your dietary needs or personal preferences while still enjoying the deliciousness of Reeses Butterfinger Cheesecake Bars!
Conclusion on Reeses Butterfinger Cheesecake Bars
Final Thoughts and Encouragement to Try the Recipe
In conclusion, the Reeses Butterfinger Cheesecake Bars are a delightful treat that combines rich flavors and textures in every bite. With their creamy cheesecake filling, crunchy Butterfinger topping, and a gluten-free almond flour crust, these bars are sure to impress anyone who tries them. They are not only easy to make but also perfect for any occasion, whether it’s a family gathering, a potluck, or simply a cozy night at home.
We encourage you to give this recipe a try! The process is straightforward, and the results are absolutely worth it. Plus, with the ability to customize the crust and toppings, you can make these bars your own. Whether you stick to the classic recipe or experiment with different variations, you’re bound to create something delicious.
So, gather your ingredients, roll up your sleeves, and get ready to indulge in these scrumptious Reeses Butterfinger Cheesecake Bars. We promise they will become a favorite in your dessert repertoire. Enjoy every bite, and don’t forget to share with friends and family—if you can bear to part with them!
Relevant Recipes Link:
Craving more delightful desserts and treats? Explore these divine recipes:
- Mint Chocolate Fudge Cheesecake Cake: A Decadent Delight
- Peanut Butter Rice Krispie Balls: A Fun and Tasty Snack
- Pistachio Blackberry Cheesecake Towers: A Heavenly Indulgence
For more mouthwatering recipes and culinary inspiration, follow us on Pinterest!